{"slug":"epson-l310-driver-download-installer","locale":"en","isFallback":false,"translationAvailable":["en","id"],"translationUrls":{"en":"/api/posts/epson-l310-driver-download-installer?locale=en","id":"/api/posts/epson-l310-driver-download-installer?locale=id"},"title":"Download Epson L310 Driver & Installation Guide (Windows)","description":"Download the latest Epson L310 driver and follow a visual step-by-step installation guide for Windows 10 and 11 to get your printer working properly.","date":"2026-02-20","updated":null,"tags":["windows","printer","driver","epson","tutorial"],"category":"Hardware Drivers","content":"\nOne of the topics I will regularly cover on this blog is printer and laptop drivers, along with their installation guides. This time, I want to discuss the **Epson L310 Printer**, which is well-known for its affordability and decent durability.\n\nI have been using this printer since 2014, and it still works well to this day. To achieve the best printing quality, it is recommended to set the printer to high mode. Although it requires careful maintenance, this printer has proven to be very durable, operating for about 9 years and still functioning properly.\n\n---\n\n## Download the L310 Printer Driver\n\nThe first step is to download the appropriate driver file. We have provided both the official Epson server link and a fast mirror link for your convenience.\n\n\n\n\n\nPlease adjust the driver selection according to the Windows version you are using (64-bit is recommended for modern systems). Let us know if any links are broken.\n\n\n---\n\n## Step-by-Step Installation Guide\n\nAfter downloading the application, follow these steps in the correct order to ensure a smooth setup:\n\n\n \n **Open the Installer** \n Open the downloaded L310 printer application by double-clicking its `.exe` file. If a Windows User Account Control (UAC) pop-up window appears, select **Yes**.\n \n\n \n **Initialize Setup** \n You will see the \"Set up\" window. Ensure the L310 series is selected, then click **OK**.\n\n  \n \n\n \n **Select Language** \n Select your desired language (e.g., \"English\"), then click **OK** to proceed to the next stage.\n\n
  \n \n\n \n **License Agreement** \n In the \"License Agreement\" window, read through the terms, select **Agree**, and then click **OK**.\n\n
  \n \n\n \n **Connection & USB Detection** \n Wait until the installation process is complete. After that, make sure your printer is connected to the computer via USB and is turned on. The system will automatically detect the port. Click **OK**.\n\n
  \n \n\n \n **Finalizing Installation** \n The installation will continue and be completed. You will see a notification that the printer is ready to use.\n\n \n
  \n
\n  \n
\n  \n \n \n\n\nAfter the installation is complete, you can start printing right away. We recommend printing a test page to verify the quality.\n\n---\n\n## Basic Printer Settings\n\nFor efficient use and to maintain the longevity of your printer, it is important to understand the basic settings.\n\n1. Open **Settings > Bluetooth & devices > Printers & scanners**.\n2. Find and select **EPSON L310 Series**, then click **Printing preferences**.\n3. In the **Main** tab, you can adjust:\n * **Paper Size:** Usually A4.\n * **Orientation:** Portrait or Landscape.\n * **Color:** Color or Grayscale printing.\n * **Quality:** Standard (faster) or High (slower, better results).\n\n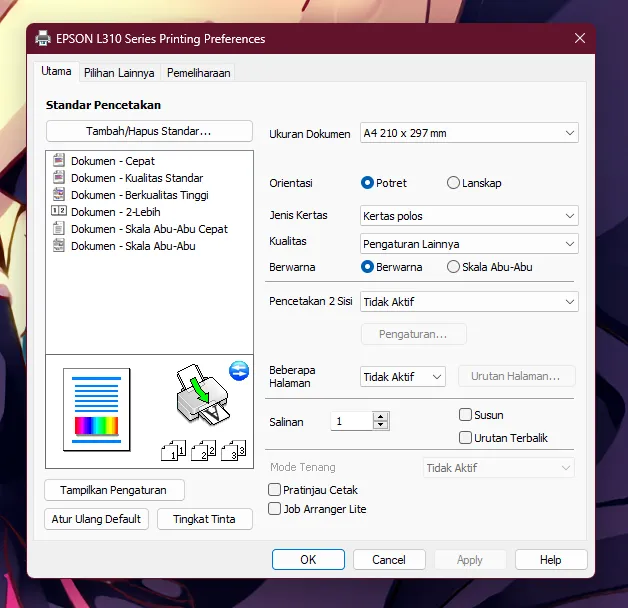\n\nIn the **Maintenance** tab, you can perform maintenance tasks like \"Nozzle Check\" or \"Head Cleaning\" if the print quality is poor or showing streaks.\n\n---\n\n### References\n1. [epson.co.id - Epson L310 Support](https://www.epson.co.id/Ink-Tank-Printers/L-Series/Epson-L310/s/SPT_C11CE57501)\n"}
\n \n \n\n\nAfter the installation is complete, you can start printing right away. We recommend printing a test page to verify the quality.\n\n---\n\n## Basic Printer Settings\n\nFor efficient use and to maintain the longevity of your printer, it is important to understand the basic settings.\n\n1. Open **Settings > Bluetooth & devices > Printers & scanners**.\n2. Find and select **EPSON L310 Series**, then click **Printing preferences**.\n3. In the **Main** tab, you can adjust:\n * **Paper Size:** Usually A4.\n * **Orientation:** Portrait or Landscape.\n * **Color:** Color or Grayscale printing.\n * **Quality:** Standard (faster) or High (slower, better results).\n\n\n\nIn the **Maintenance** tab, you can perform maintenance tasks like \"Nozzle Check\" or \"Head Cleaning\" if the print quality is poor or showing streaks.\n\n---\n\n### References\n1. [epson.co.id - Epson L310 Support](https://www.epson.co.id/Ink-Tank-Printers/L-Series/Epson-L310/s/SPT_C11CE57501)\n"}