{"slug":"install-windows-or-ubuntu-first","locale":"en","isFallback":false,"translationAvailable":["en","id"],"translationUrls":{"en":"/api/posts/install-windows-or-ubuntu-first?locale=en","id":"/api/posts/install-windows-or-ubuntu-first?locale=id"},"title":"Windows vs Ubuntu: Which Should You Install First for Dual-Boot?","description":"Planning a dual-boot setup? Discover why the order of installation matters for Windows 11 and Ubuntu, plus the optimal partition scheme for a stable system.","date":"2026-04-17","updated":null,"tags":["windows-11","ubuntu-25-10","dual-boot","linux","tutorial","setup"],"category":"Linux","content":"\nI was recently staring at my MSI Modern 14 B11MOU, feeling that familiar itch of a system that needed a fresh start. I had been running a dual-boot of Windows 11 and Ubuntu for a while, but it felt cluttered and poorly planned. I decided it was time for a clean slate—wiping everything and installing Windows 11 25H2 alongside Ubuntu 25.10 with a more deliberate partition scheme.\n\nOne question always comes up when you're planning this kind of setup: which OS goes first? It might seem trivial, but getting this order wrong can lead to a messy bootloader rescue mission that nobody wants to deal with on a Saturday night.\n\n## Why the Installation Order Actually Matters\n\nIt all comes down to the **bootloader**—the tiny piece of software that runs before anything else, giving you the choice of which operating system to start. \n\nIf you install Ubuntu first and then Windows, you’ll find that Windows is quite selfish. Its installer will aggressively overwrite Ubuntu's GRUB bootloader with the Windows Boot Manager. The result? Your Ubuntu partition is still there, but you can't access it because the menu to choose it has disappeared.\n\nOn the other hand, if you **install Windows first and then Ubuntu**, the process is much smoother. Ubuntu’s GRUB bootloader is designed to be a good neighbor. It will automatically detect your existing Windows installation and add it to the boot menu. Once the installation is finished, you’ll immediately see a menu allowing you to choose between the two systems without any extra intervention.\n\n## My Optimal Partition Strategy\n\nFor my MSI laptop with its 500GB NVMe SSD, I wanted a layout that offered both stability and flexibility. I decided to ditch the factory MSI recovery partition to gain some extra space, as I can always download the drivers and recovery tools from their website if needed.\n\nHere is the final partition layout I used for this fresh build:\n\n| Partition | Size | Filesystem | Mount Point | Function |\n| :--- | :--- | :--- | :--- | :--- |\n| `/dev/nvme0n1p1` | 200 MiB | fat32 | `/boot/efi` | EFI System Partition (boot, esp) |\n| `/dev/nvme0n1p2` | 16 MiB | unknown | - | Microsoft Reserved (msftres) |\n| `/dev/nvme0n1p3` | 243.17 GiB | ntfs | - | Windows 11 (Main Partition) |\n| `/dev/nvme0n1p4` | 774 MiB | ntfs | - | Recovery Partition (Hidden) |\n| `/dev/nvme0n1p5` | 93.13 GiB | ext4 | `/` | Root (Linux OS) |\n| `/dev/nvme0n1p6` | 128.49 GiB | ext4 | `/home` | Home (Personal Files) |\n\n\nThis is how my storage looks in GParted after managing the space for both Windows 11 and Ubuntu.
\n\nI decided to bump the EFI partition to 200 MiB. Windows usually defaults to 100 MiB, which can feel a bit cramped once you add GRUB and potentially other EFI entries into the mix. Also, I strictly separate `/` (Root) and `/home` in Linux. This is a classic best practice; if I ever need to reinstall Ubuntu, my personal files, projects, and even my large VirtualBox VMs stored in `/home` remain untouched.\n\n## Choosing the Right Filesystem\n\nWhen it comes to the Linux side of things, I always stick with **ext4**. While newer filesystems like Btrfs or ZFS have cool features like snapshots or pooling, ext4 is the reliable workhorse. It’s mature, fast enough for a daily driver, and has excellent recovery tools if things ever go sideways. For a laptop that I rely on for work and development, stability is my top priority.\n\n## Essential Windows Tweaks Before Installing Linux\n\nOnce Windows 11 is installed, there are two crucial steps you must take before you even touch that Ubuntu USB drive.\n\nFirst, you need to **disable Fast Startup**. While it sounds like a good thing, Fast Startup essentially puts Windows into a partial hibernation. This \"locks\" the Windows NTFS partition. If Ubuntu tries to mount that partition while it's locked, you risk data corruption or at the very least, an error preventing you from accessing your files. \n\nYou can find this in **Control Panel → Power Options → Choose what the power buttons do**.\n\n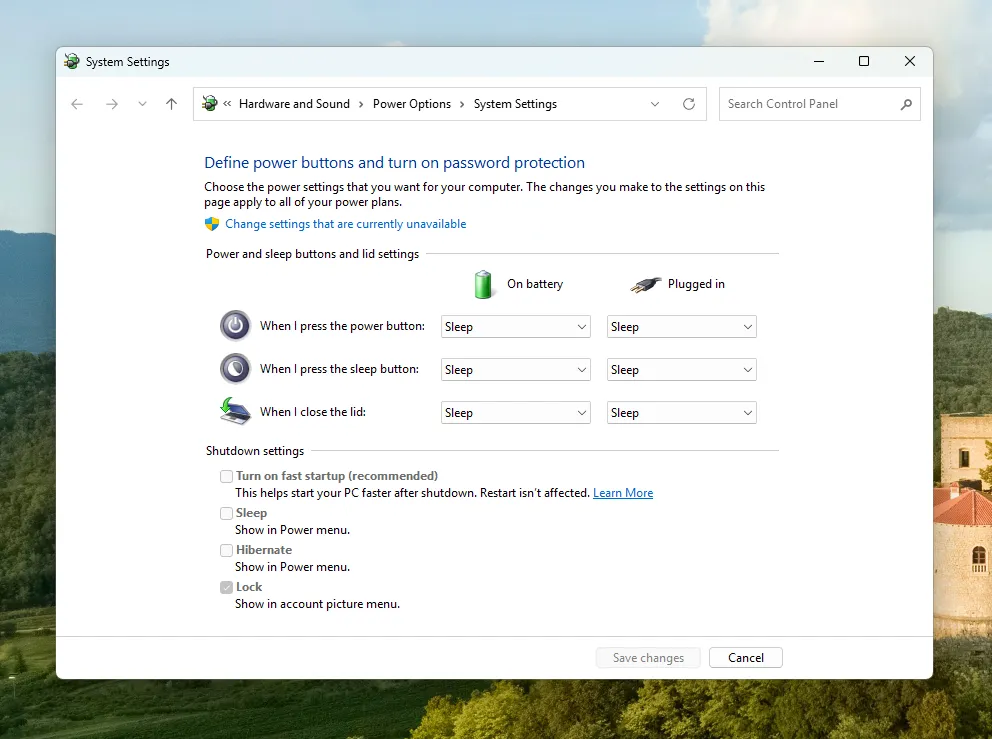\nMake sure to uncheck the \"Turn on fast startup\" option to prevent partition locking.
\n\nSecond, I highly recommend disabling Hibernation entirely to save space and avoid similar locking issues. Open a Command Prompt as Administrator and run:\n\n```cmd\npowercfg /h off\n```\n\n## The Dual-Boot Installation Path\n\n\n \n ### Backup Everything\n Seriously, don't skip this. Use OneDrive or an external drive. A clean install wipes everything, and even with a plan, mistakes happen.\n \n\n \n ### Install Windows 11 First\n Use your bootable USB and choose **Custom Installation**. Create your EFI (200 MiB) and main Windows partition (around 240 GiB), leaving the rest as \"Unallocated Space.\" Let Windows finish its setup entirely.\n \n\n \n ### Prepare the Windows Environment\n Go through the initial Windows setup, install your basic drivers, and most importantly, disable Fast Startup and Hibernation as mentioned above.\n \n\n \n ### Install Ubuntu\n Boot from your Ubuntu USB. When you reach the partitioning step, choose **\"Something else.\"** This gives you full control. Create your `/` partition (93 GiB) and `/home` partition (the rest) from that unallocated space. Ensure the bootloader installation is set to the main disk device (e.g., `/dev/nvme0n1`).\n \n\n \n ### Fix the Clock Sync\n By default, Windows and Linux handle the hardware clock differently, which usually results in your clock jumping by several hours every time you switch OS. I've written a [specific guide on how to fix this clock sync issue](/notes/fix-dual-boot-clock-sync-windows-ubuntu).\n \n\n\n## A Note on Secure Boot\n\nUbuntu 25.10 supports Secure Boot quite well, but for a dual-boot architecture, I personally prefer to keep **Secure Boot OFF** in the BIOS. It simplifies things if you eventually need to install third-party drivers or certain virtualization software like VirtualBox, which might otherwise require setting up Machine Owner Keys (MOK).\n\nRefreshing this setup on my MSI Modern 14 has made it feel like a new machine again. Windows 11 25H2 stays clean for my office tasks, while Ubuntu handles my development work. It’s a workflow that has served me well for years, and with the right installation order, it's easier to set up than you might think.\n\nHave you tried setting up a dual-boot recently? If you ran into any weird hurdles or found a better partition scheme, I’d love to hear about it in the comments!\n"}