How to Connect Your Laptop to an External Monitor on Windows 11 & Ubuntu
Iwan Efendi6 min
Connect your laptop to an external monitor on Windows 11 and Ubuntu to instantly double your workspace and fix common detection errors.
Baca dalam IDID
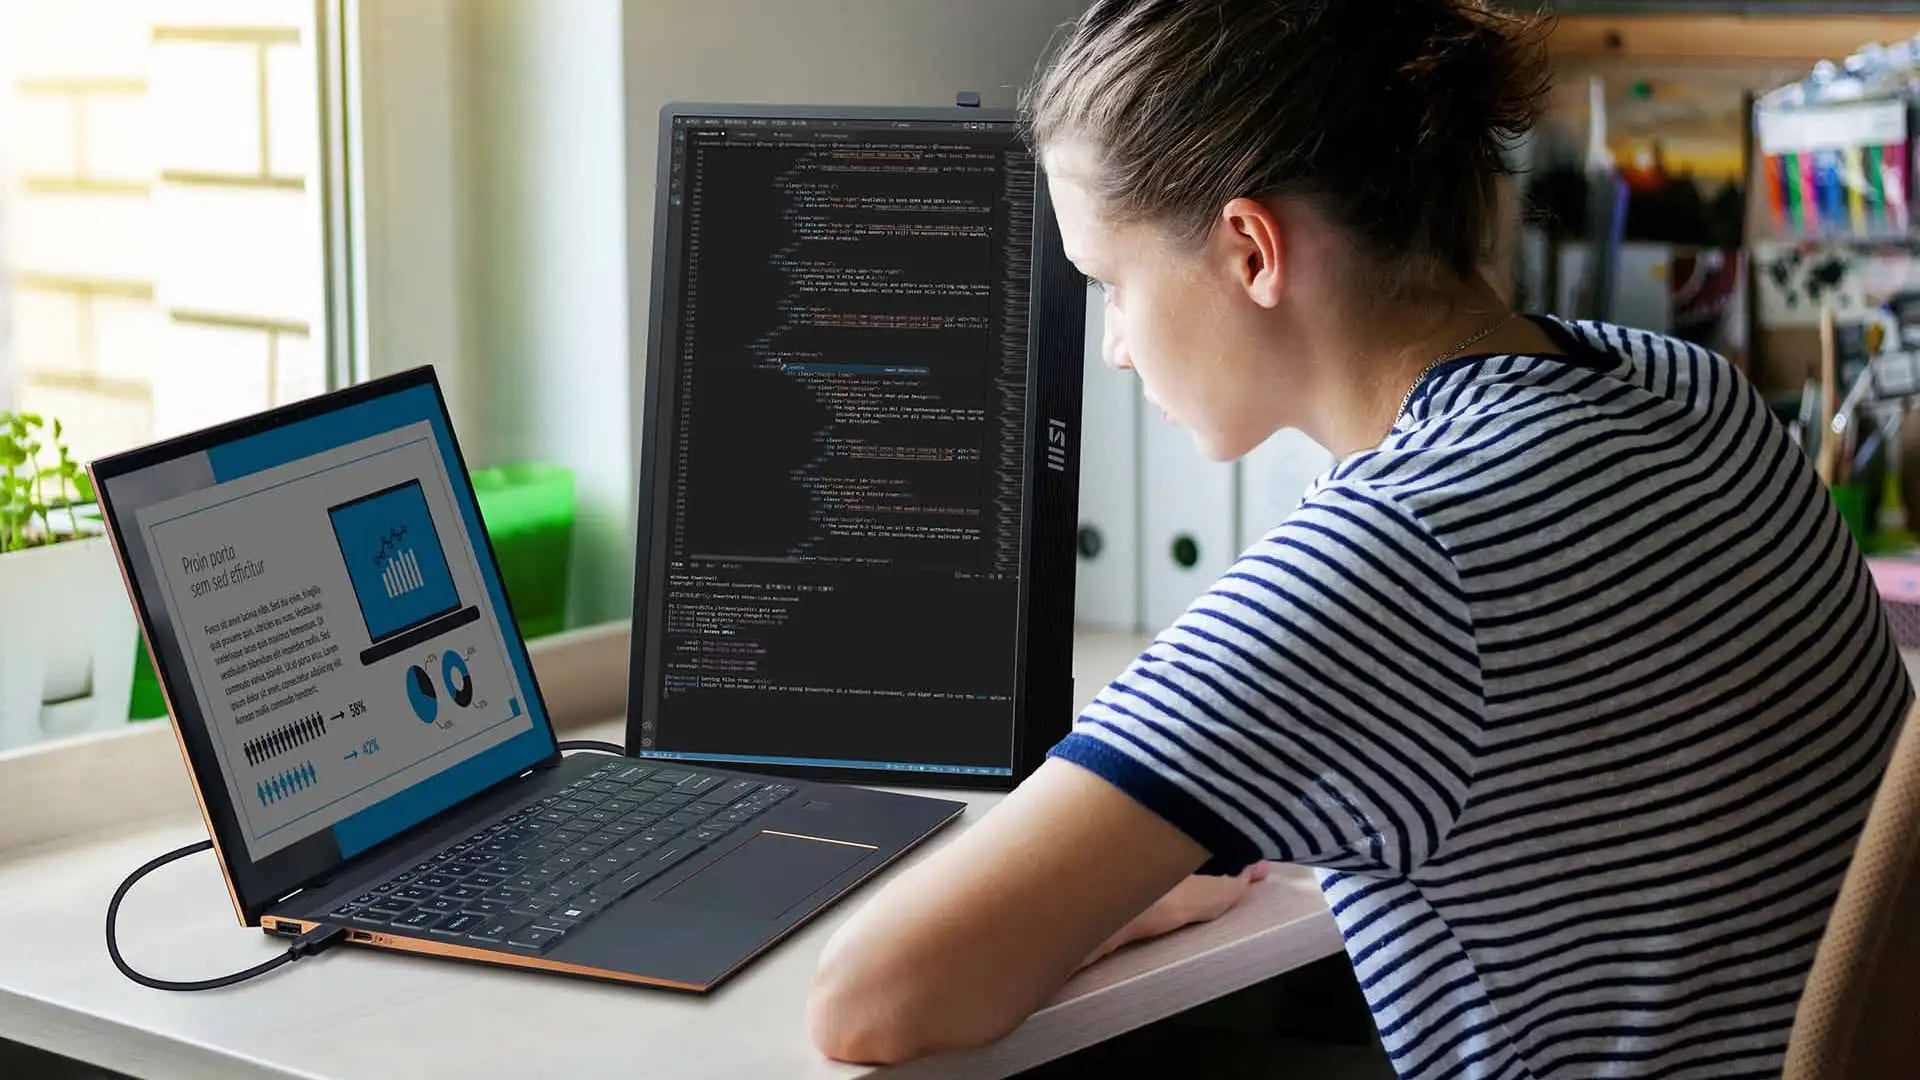
Staring at a cramped 14-inch screen while a beautiful 27-inch monitor gathered dust on my desk felt like a huge waste of potential. I finally decided to hook them up to double my workspace, but since I dual-boot Windows 11 and Ubuntu, getting the display to run perfectly on both operating systems required a bit of tweaking.
It surprisingly took me a few confusing minutes to realize why my external screen remained black on Linux despite working flawlessly on Windows. If you are stuck staring at a "No Signal" message, this guide will help you configure your dual-monitor setup correctly across both platforms.
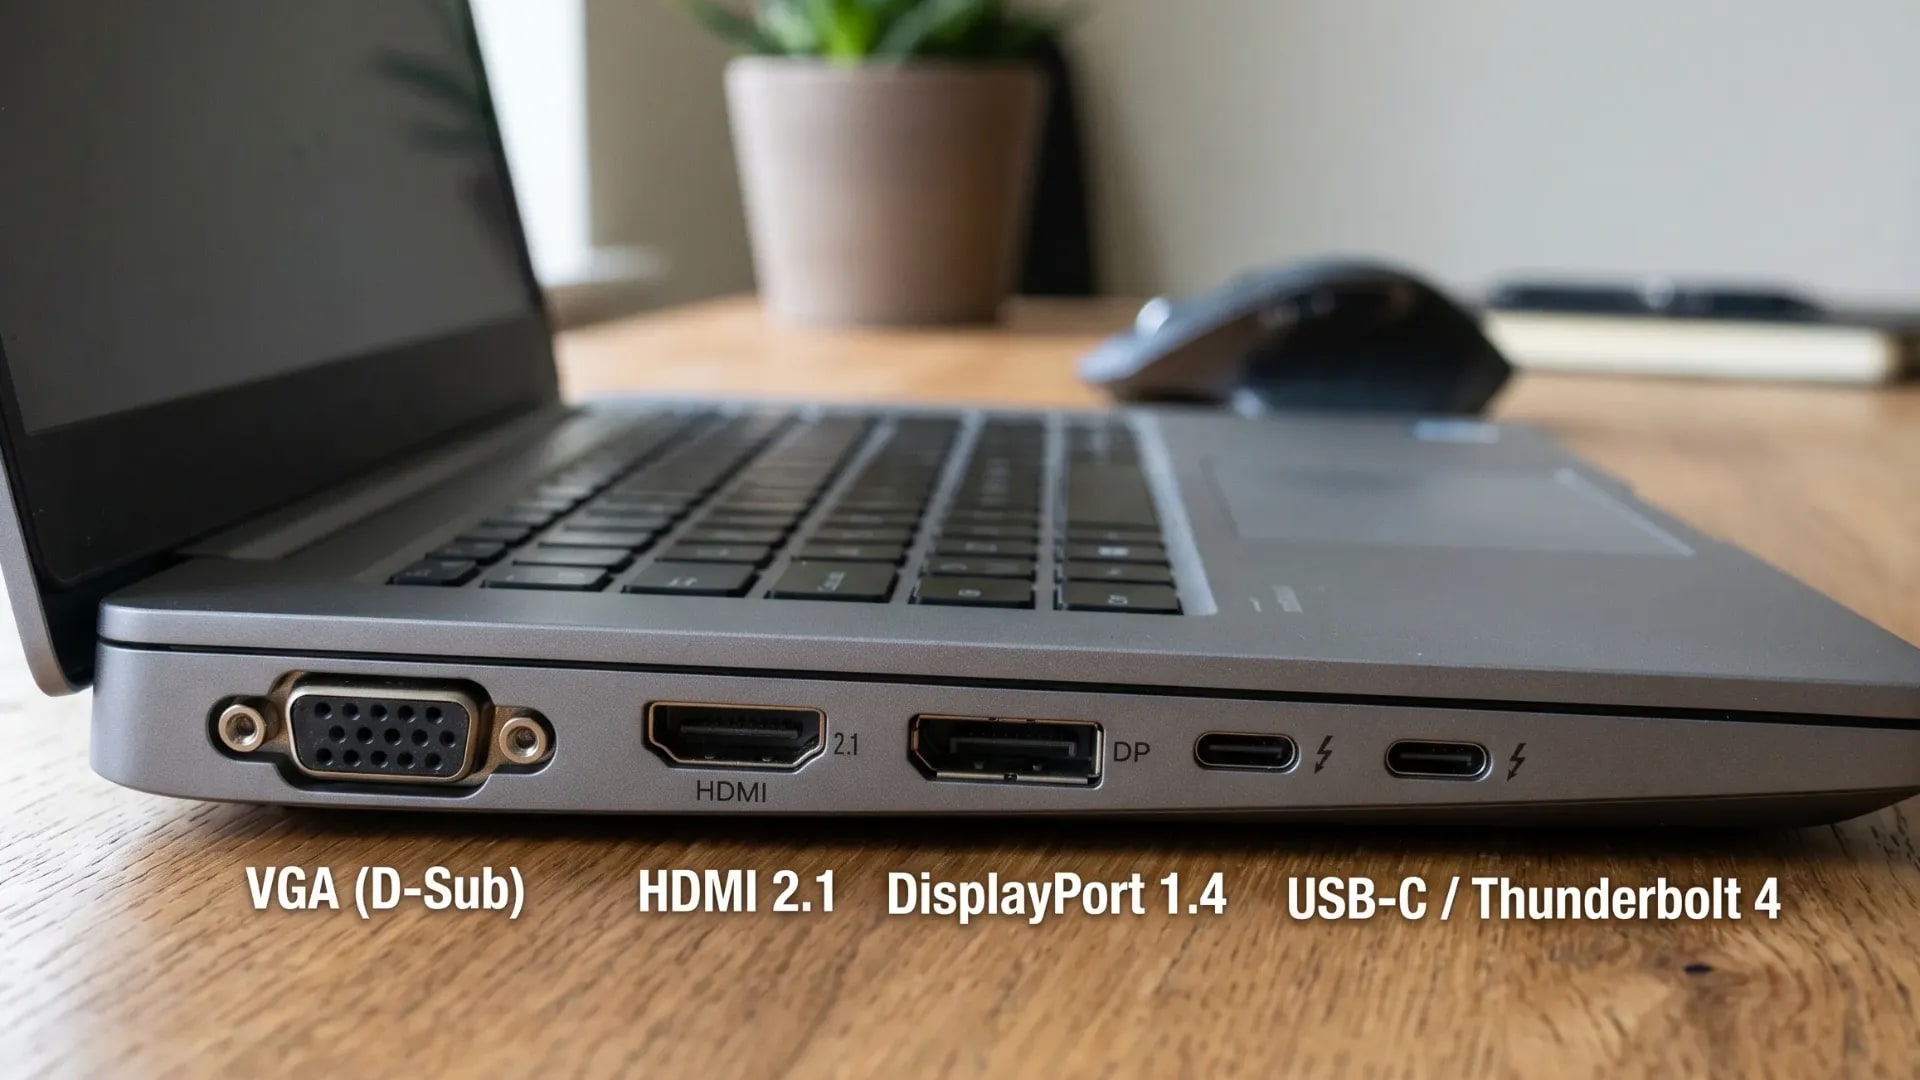
Before you grab any random cable, you need to check exactly what display ports are available on your laptop. I initially tried forcing a cheap adapter, only to discover my laptop's USB-C port did not actually support video output.
Most modern laptops use one of these common connections:
 The physical setup is identical regardless of which operating system you boot into first.
 Windows 11 usually handles external displays seamlessly, automatically expanding your desktop space right away.
You can quickly change how the screen behaves by pressing Windows + P. This opens the projection menu where you should select Extend to use both screens independently.
If the mouse movement between the screens feels disconnected or misaligned, you need to fix the physical arrangement.
Windows 11 usually handles external displays seamlessly, automatically expanding your desktop space right away.
You can quickly change how the screen behaves by pressing Windows + P. This opens the projection menu where you should select Extend to use both screens independently.
If the mouse movement between the screens feels disconnected or misaligned, you need to fix the physical arrangement.
 Ubuntu with the GNOME desktop environment is generally quite smart about detecting external monitors, but it sometimes defaults to mirroring your screen instead of extending it.
I actually panicked slightly when my monitor first lit up on Ubuntu because the scaling looked completely broken. Fixing it only took a quick trip to the settings.
Ubuntu with the GNOME desktop environment is generally quite smart about detecting external monitors, but it sometimes defaults to mirroring your screen instead of extending it.
I actually panicked slightly when my monitor first lit up on Ubuntu because the scaling looked completely broken. Fixing it only took a quick trip to the settings.
 Sometimes, the monitor simply refuses to wake up. This happens more frequently on Linux, especially if you are using a dedicated graphics card.
If that fails and you use an NVIDIA GPU, you probably need to install the correct proprietary drivers. Run
Adding an external monitor is one of the easiest ways to boost your daily productivity without upgrading your entire machine. While Windows 11 usually handles the transition flawlessly, Ubuntu might require a gentle nudge with driver updates to get everything running smoothly.
Once your screens are properly aligned, I highly recommend exploring window management tools like PowerToys FancyZones on Windows or the Pop Shell extension on GNOME to keep your newly expanded workspace organized.
Have you run into any weird display glitches that were not covered here? Let me know how you fixed them in the comments below!
If you are running a dual-boot setup like mine, these articles might also be relevant:
Sometimes, the monitor simply refuses to wake up. This happens more frequently on Linux, especially if you are using a dedicated graphics card.
If that fails and you use an NVIDIA GPU, you probably need to install the correct proprietary drivers. Run
Adding an external monitor is one of the easiest ways to boost your daily productivity without upgrading your entire machine. While Windows 11 usually handles the transition flawlessly, Ubuntu might require a gentle nudge with driver updates to get everything running smoothly.
Once your screens are properly aligned, I highly recommend exploring window management tools like PowerToys FancyZones on Windows or the Pop Shell extension on GNOME to keep your newly expanded workspace organized.
Have you run into any weird display glitches that were not covered here? Let me know how you fixed them in the comments below!
If you are running a dual-boot setup like mine, these articles might also be relevant:
Identify Your Ports
- HDMI: The most universal standard that carries both high-quality video and audio simultaneously.
- DisplayPort (DP): Often found on gaming or workstation laptops, offering higher refresh rates.
- USB-C / Thunderbolt: Extremely versatile, but you must ensure it specifically supports DisplayPort Alt Mode to output video.
Zoom
Always check if your laptop ports support direct video output before buying cables.
Making the Physical Connection
1
Plug in the display cable
Securely connect the HDMI or DisplayPort cable from your laptop directly into the back of your external monitor.2
Select the correct input source
Turn on the monitor and use its physical buttons to select the correct input channel, such as HDMI 1 or DisplayPort.3
Wake up your laptop
Turn on your laptop or wake it from sleep mode. In most ideal scenarios, the monitor will immediately mirror your laptop screen.Zoom
Ensure the cable is pushed firmly into the port until you feel a soft click.
If your screen remains entirely blank after plugging it in, we need to adjust the software settings.
Configuring Windows 11
1
Open display settings
Right-click anywhere on your empty desktop and select Display settings from the context menu.2
Rearrange the screens
Drag and drop the numbered rectangles to match exactly how your monitors sit on your physical desk. Click the Identify button if you are unsure which number belongs to which screen.3
Adjust refresh rate and resolution
Scroll down to ensure the resolution matches your monitor's native spec, such as 2560×1440. If you have a high refresh rate monitor, do not forget to enable 144Hz in the advanced display settings.Zoom
Dragging the display boxes in Windows 11 aligns your mouse cursor transitions.
Configuring Ubuntu
1
Access the displays menu
Open your main system Settings and navigate to the Displays tab on the left sidebar.2
Choose join displays mode
At the top of the window, select Join Displays to expand your workspace across both monitors rather than copying the same image.3
Set primary display and refresh rate
Click on your larger monitor's rectangle, adjust its resolution, and toggle the Primary Display switch if you want your main dock and top bar to live there.4
Apply changes
Click the Apply button at the top right. Ubuntu gives you a 10-second window to confirm the new layout before reverting to the old settings.Zoom
Ubuntu settings allow you to easily define which monitor holds your main application dock.
Troubleshooting Common Detection Errors
On Windows 11
If Windows fails to detect the monitor, open your Display settings and manually click the Detect button located under the multiple displays section. If nothing happens, you should open the Device Manager and check if your display adapters need a driver update. A loose cable is also a surprisingly common culprit, so try reseating both ends firmly.On Ubuntu
Linux detection issues are almost always tied to proprietary graphics drivers, particularly with NVIDIA hardware. You can force a manual detection by opening your terminal and typing:xrandr --autoubuntu-drivers devices in the terminal to see what is available, then install the recommended package. A quick system restart usually brings the external monitor to life.
Wrapping Up
Dual-Boot and Multi-Monitor Related Guides
- Windows vs Ubuntu: Which Should You Install First for Dual-Boot? — the installation order matters more than you think for bootloader stability.
- Why Dual-Boot Is Still Relevant in 2026 — a deeper look at balancing Windows and Linux in daily use.
- KDE Plasma Finally Gets Per-Screen Virtual Desktops — if you use KDE instead of GNOME, this feature changes everything with multiple monitors.
Frequently Asked Questions
Can I use different refresh rates on each monitor?
Yes, both Windows 11 and Ubuntu support per-monitor refresh rates. In Windows, select each display individually in Display settings and change the refresh rate under Advanced display. In Ubuntu, click each monitor rectangle in the Displays settings panel to configure its refresh rate independently.My laptop gets hot when using an external monitor. Is that normal?
It depends. Driving a second display does put additional load on your GPU, which generates more heat. If your laptop fan is running louder but temperatures stay below 85°C, that is normal. If it throttles or shuts down, consider checking thermal paste or using a laptop cooling pad.Does connecting a 4K monitor to my laptop reduce performance?
It can. A 4K monitor has four times the pixels of 1080p, so your GPU works harder. For general productivity and browsing, most modern laptops handle 4K just fine. For gaming or video editing at 4K, you will need a laptop with a dedicated GPU.Why does my monitor flicker briefly when I plug it in?
Brief flickering during initial connection is normal — the display negotiates resolution, refresh rate, and color depth with the GPU. If flickering persists after the handshake, try a different cable or update your display drivers.References
Topics
Topics in this article
Explore related topics and continue reading similar content.
Share this article
Discussion
Preparing the comments area...