Fixing Firebase Auth Domain Errors on Localhost IP
Iwan Efendi3 min
A technical guide on fixing the Firebase Localhost Authentication error when testing applications on a local network IP address (e.g., 172.16.x.x).
Baca dalam IDID
Have you ever tried to test your local web application from another device on the same network, only to find that the login features suddenly broke? I just experienced it today.
While developing and integrating an Admin Injector feature for a number generator tool into Firebase Firestore, the app was running flawlessly on
 By default, when you construct a new project in Firebase, the system considers
There are two distinct methods for fixing this issue, depending largely on how extensive your local testing scope needs to be:
Once that IP is neatly registered on your authorized roster, any device linking in through that specific IP will sail through the login authentication process completely unimpeded.
By default, when you construct a new project in Firebase, the system considers
There are two distinct methods for fixing this issue, depending largely on how extensive your local testing scope needs to be:
Once that IP is neatly registered on your authorized roster, any device linking in through that specific IP will sail through the login authentication process completely unimpeded.
2. Explicitly Use the
If you are just casually testing from your primary developer rigorous PC/Laptop and inadvertently launched the URL natively from an open CLI prompt, simply correct your trajectory. All you need to do is modify the URL displayed in your browser's top bar.
Switch strictly from
Q: Can I use a wildcard (e.g.,
localhost:9003. However, wanting to ensure everything was properly responsive, I attempted to access this local environment via my local network IP address, specifically 172.16.0.2:9003.
This is where the trouble started. Upon hitting the login button, the screen threw a rather explicit message:
Firebase Console Error
This domain is not authorized for OAuth operations for your Firebase project. Edit the list of authorized domains from the Firebase console.
Zoom
Why Does This Happen?
localhost and 127.0.0.1 as presumed, fully-authorized domains tailored for safe OAuth redirect testing. However, from Firebase's perspective, local network IPs like 192.168.x.x or 172.16.x.x are viewed as entirely separate and external domains.
This stringent measure is strictly security-bound. Firebase locks down redirect domains so that malicious operators cannot seamlessly plug your API credentials into unauthorized phishing portals.
How to Resolve It
1. Add the IP to Authorized Domains (Recommended for Cross-Device Testing)
If you absolutely must test the application fluidly on a physical smartphone or secondary device, you must manually log this IP into Firebase's whitelist.1
Navigate straight to your Firebase Console dashboard.
2
Select the Authentication tab, then tap on Settings.
3
Search for the Authorized domains panel securely on the left sidebar.
4
Click the unmistakable Add domain button.
5
Enter the precise localhost IP address causing the glitch (e.g., 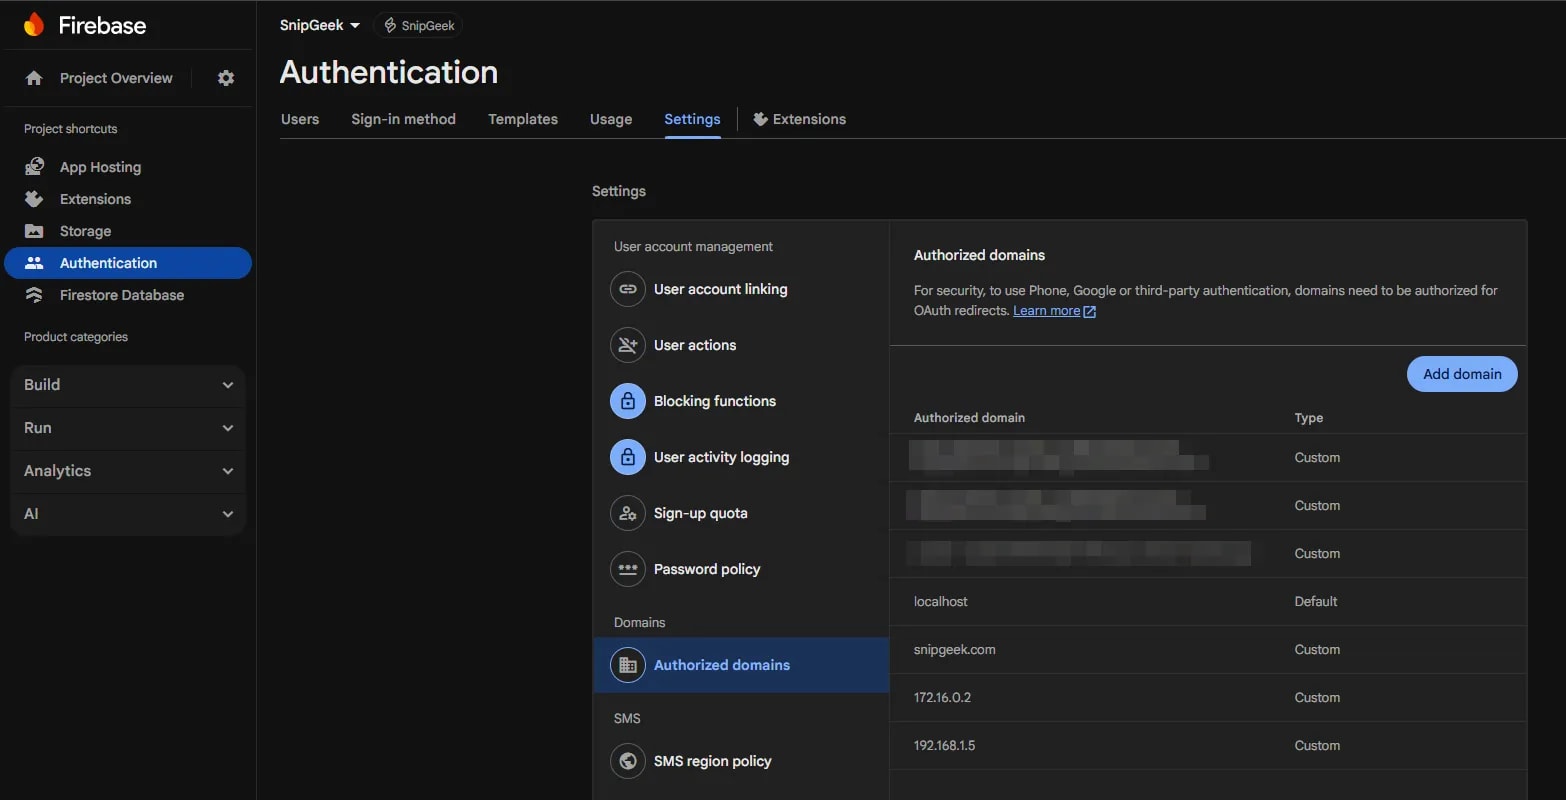
172.16.0.2), bearing in mind to enter it completely bare—without any http:// prefixes or port numbers. Zoom
6
Press Add/Save to finalize.
2. Explicitly Use the localhost Hostname (The Pragmatic Approach)
If you are just casually testing from your primary developer rigorous PC/Laptop and inadvertently launched the URL natively from an open CLI prompt, simply correct your trajectory. All you need to do is modify the URL displayed in your browser's top bar.
Switch strictly from http://172.16.0.2:9003 back over to standard http://localhost:9003. This happens to be the most efficient and scalable methodology because local network IP addresses are highly prone to shift dramatically when you jump router connections (like heading to a local cafe), whereas localhost remains a securely authorized Firebase safe haven no matter where your keyboard takes you.
When dealing with multiple environments or complex domain configurations, refer to the case study on Disqus Production Domain Isolation for advanced strategies. For broader multilingual setup issues, the Multilingual SEO Hardening Plan provides insights into managing domain and locale settings securely.
FAQ
172.16.0.*) to authorize a range of local IP addresses?
A: No, Firebase does not support wildcard entries for IP addresses in authorized domains. Each IP address must be added explicitly. This is a security measure to prevent broad authorization of potentially insecure network ranges.
Q: What if my local IP address changes frequently?
A: If your local IP address changes often (e.g., due to DHCP leases or moving between networks), it's recommended to stick with localhost for testing as much as possible. If cross-device testing with a dynamic IP is unavoidable, you will need to update the authorized domains in Firebase Console each time your IP changes, or configure a static IP address for your development machine.
Q: Are there any security risks in adding a local IP address to Firebase authorized domains?
A: Adding a local IP to authorized domains is generally safe as long as your local network itself is secure. The primary risk is if an attacker gains access to your local network and can spoof your development IP, potentially exploiting the authorized domain. Always ensure your local development environment and network are protected with strong security practices.
Q: Does this issue affect production deployments?
A: No, this issue is specific to local development environments where you might access your app via a non-standard IP. Production deployments typically use stable domain names (e.g., your-app.com) which should already be configured as authorized domains in your Firebase project. Ensure all production domains are correctly listed to avoid authentication failures in live environments.
References
- Firebase Authentication — Authorized Domains — Official Firebase documentation on managing authorized domains for web authentication.
- Google Cloud Identity Platform — Domain Restrictions — Further technical details on domain restrictions and security best practices for Google Cloud Identity Platform, which Firebase Auth builds upon.
- MDN Web Docs — What is localhost? — Explanation of
localhostand its implications for web development. - Cisco — Local Area Network (LAN) Security — General information on securing local area networks, relevant for understanding risks when exposing local IPs.
Topics
Topics in this note
Explore related ideas through the topics connected to this note.
Share this article
Discussion
Preparing the comments area...