How to Rename Your PC in Windows 11 (Quick Guide & Alternatives)
Iwan Efendi2 min

Learn how to rename your Windows 11 PC using Settings, PowerShell, or the legacy Control Panel, understand its network impact, and resolve common rename issues.
Baca dalam IDID
When you install a fresh copy of Windows 11, the operating system automatically assigns a random, cryptic name like
Having a descriptive and organized computer name is essential in daily administration, especially when you need to:
This is the standard and easiest way for most users.
If you are setting up multiple machines or prefer the CLI, you can rename your PC using a single PowerShell command:
If the modern Settings app hangs or fails to open, you can use the legacy System Properties dialog:
Renaming your PC changes how it communicates on a local network. Be aware of the following details:
DESKTOP-CFL3R1S or LAPTOP-8N2K9LQ. While it works fine, renaming it to something meaningful (like STUDIO-PC, WORKSTATION-01, or RINA-LAPTOP) makes device management much easier.
In this guide, I will show you how to rename your Windows 11 PC in under 2 minutes using three different methods: Windows Settings, PowerShell, and the classic System Properties dialog. We will also discuss the network impact of renaming a PC and how to troubleshoot common post-rename errors.
Why Renaming Your PC Matters
- Identify devices connected to your home or office Wi-Fi router.
- Access shared folders or local printers over LAN.
- Manage devices linked to your Microsoft account or Microsoft Entra ID (Azure AD).
- Establish Remote Desktop (RDP) connections without having to lookup dynamic IP addresses.
Prerequisites Before Renaming
- You must be logged in with an account that has Administrator privileges.
- Naming rules: Windows computer names cannot exceed 15 characters, cannot contain spaces, and cannot include special characters like
` ~ @ # $ % ^ & * ( ) = + [ ] { } ; : ' " , < > / ? |. - Save all open work, as a system restart is required to apply the new name.
Method 1: Rename via Windows 11 Settings (Recommended)
1
Open System settings quickly
Right-click the Start button and select System from the WinX menu. Fastest path: Start right-click -> System.
Zoom
2
Click "Rename this PC"
Under the System > About page, click the Rename this PC button located next to your current computer name.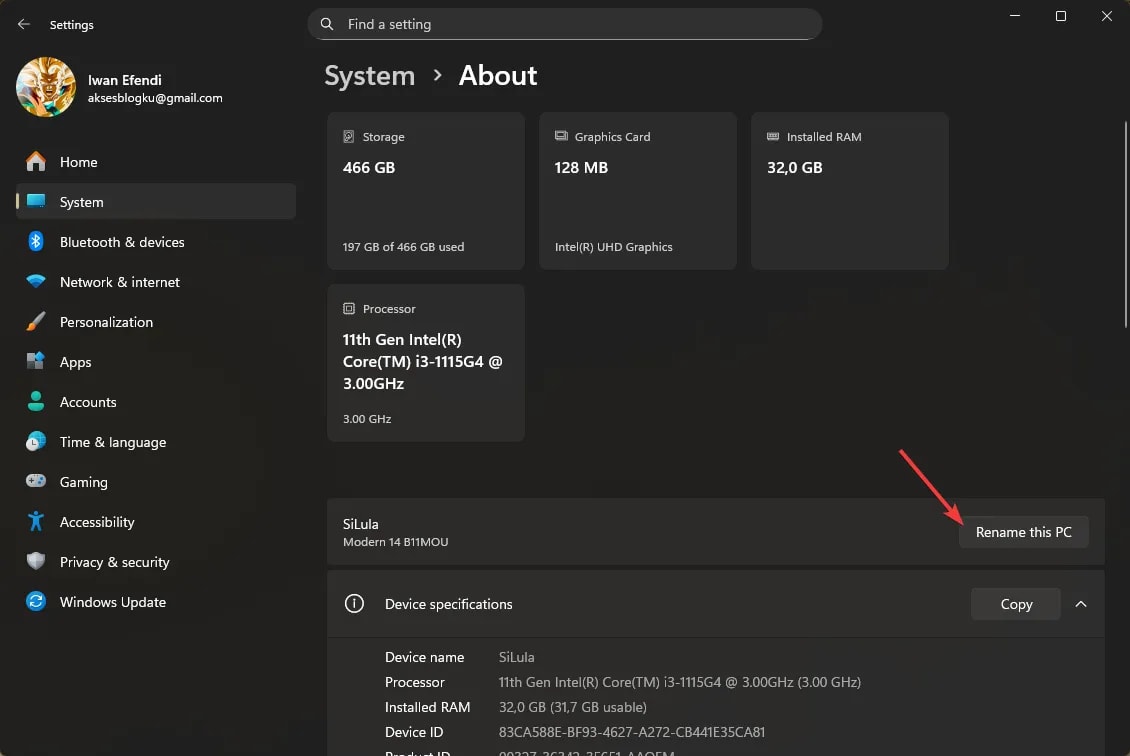 You will see the current name at the top of this page.
Zoom
3
Enter your new name
Type your new computer name (remember: no spaces or special symbols), then click Next.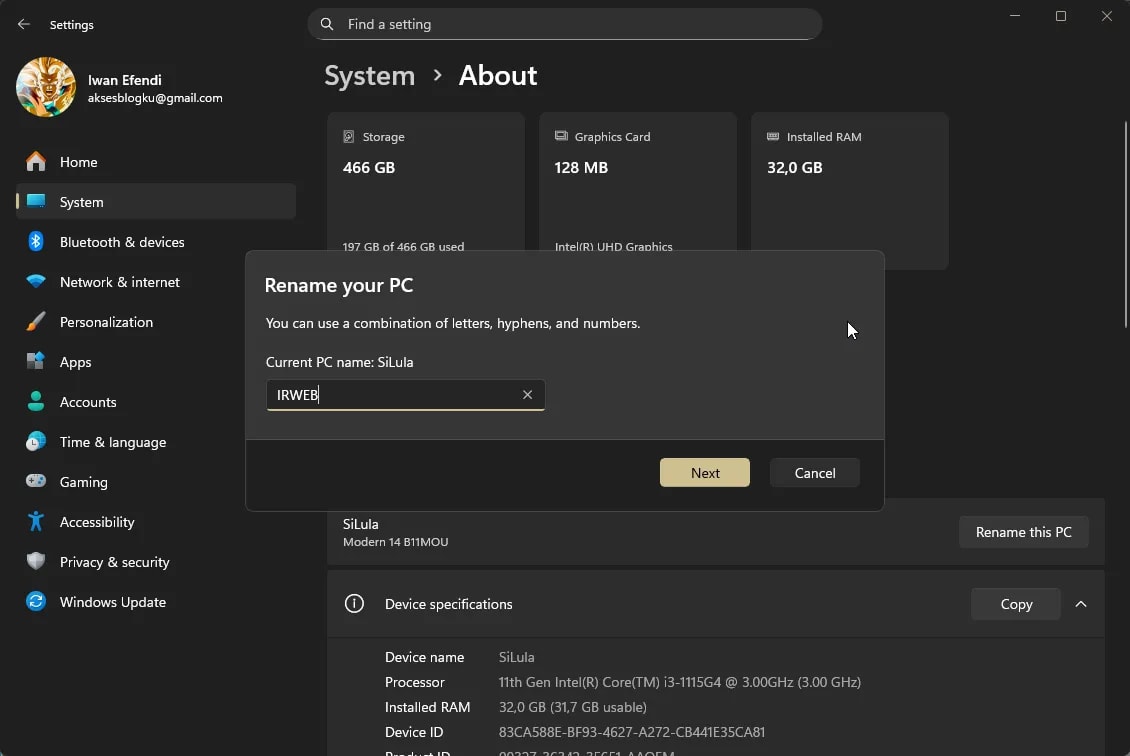 Use a consistent naming pattern if you have multiple devices.
Zoom
4
Restart your computer
Click Restart now to immediately apply the change, or Restart later to save your files first. The rename process is complete only after reboot.
Zoom
Method 2: Rename via PowerShell (For Advanced Users)
1
Open PowerShell as Administrator
Right-click Start, choose Terminal (Admin) or PowerShell (Admin), and click Yes on the UAC prompt.
2
Run the Rename command
Type the following command, replacing The
MY-NEW-PC with your desired name, and press Enter:Rename-Computer -NewName "MY-NEW-PC" -Restart-Restart switch will automatically reboot your computer to apply the change immediately.Method 3: Rename via System Properties (sysdm.cpl)
1
Open the Run dialog
Press Win + R, type
sysdm.cpl, and press Enter.2
Access the Computer Name settings
In the System Properties window, make sure you are on the Computer Name tab and click the Change... button.
3
Enter the name and save
Type your new name in the Computer name field, click OK, close the properties window, and select Restart Now when prompted.
Network and Sharing Impact (Crucial Details)
- Shared Folder Paths (UNC): If you shared a folder under
\\DESKTOP-CFL3R1S\MySharedFolder, network users must now access it using\\MY-NEW-PC\MySharedFolder. The old address will return a network path not found error. - RDP/Remote Access: Any Remote Desktop clients configured to connect to the old PC name must be updated to target the new name.
- DNS/Router Cache Delay: Sometimes, other PCs on the network may still see your old PC name. This happens because local routers or Windows DNS caches take time to clear. You can speed this up by running
ipconfig /flushdnsin the Command Prompt of client machines.
FAQ
Can I use spaces in my Windows 11 PC name?
No. Spaces are not allowed in NetBIOS/DNS naming conventions. Instead of spaces, use hyphens or dashes (e.g.,OFFICE-LAPTOP-01 instead of OFFICE LAPTOP 01).
Will renaming my PC delete my personal files?
No. Renaming your PC only changes the network identifier and the system name. All your files, user accounts, applications, and settings will remain completely untouched.Why is the "Rename this PC" option grayed out?
This typically occurs if you are logged in as a standard user instead of an Administrator. If it is a school or work laptop, the network administrator has likely disabled renaming via Group Policy.How do I verify if the change was successful?
After rebooting, open Command Prompt or Terminal and run the commandhostname. It will output the active name of your device.Topics
Topics in this article
Explore related topics and continue reading similar content.
Share this article
Discussion
Preparing the comments area...