How to Share a Folder in Windows 11 via LAN and WiFi
Iwan Efendi4 min

Share folders in Windows 11 over LAN or WiFi with network discovery, permissions, IP access, password sharing, firewall, and SMB troubleshooting.
Baca dalam IDID
Folder sharing is still one of the most practical features in Windows 11, especially when you work with teammates on the same local network.
I still use this setup in small office environments because it is simple, fast, and saves time. Instead of repeatedly moving files with a flash drive, everyone can open the same folder directly from their own PC.
In this guide, I will walk you through the full setup flow: enabling required network settings, sharing a folder with proper permissions, opening it from another computer using the target IP address, and fixing common problems such as permission errors or a PC that does not appear in Network.
Before sharing any folder, make sure all devices on your network can see each other.
Inside this page, configure all three network profiles. For trusted home or office networks, you can enable all sharing options to avoid discovery issues.
 Set all network profiles to enable Network Discovery and File Sharing.
Apply this setting on devices that will share folders and devices that will access them.
After network discovery is configured, share the folder you want other users to access.
Set all network profiles to enable Network Discovery and File Sharing.
Apply this setting on devices that will share folders and devices that will access them.
After network discovery is configured, share the folder you want other users to access.
 Choose Everyone and set Read/Write if users need to edit files.
To open the shared folder from another computer, you need the IP address of the source PC.
Choose Everyone and set Read/Write if users need to edit files.
To open the shared folder from another computer, you need the IP address of the source PC.
 Use the IPv4 Address from
 Use
If the folder still does not appear, check these points before rebuilding the whole setup:
For a home or small office setup, this permission pattern is usually safer:
Use
If the folder still does not appear, check these points before rebuilding the whole setup:
For a home or small office setup, this permission pattern is usually safer:
At this point, your local file transfer workflow becomes much easier: faster collaboration, fewer duplicate copies, and no more dependency on flash drives for every update. If you are preparing several Windows PCs, you may also want to rename each PC first so the device list is easier to recognize.
Step 1: Enable Network Discovery First
1
Open network settings
Open Settings in Windows 11, then go to Network & internet.
2
Go to advanced sharing options
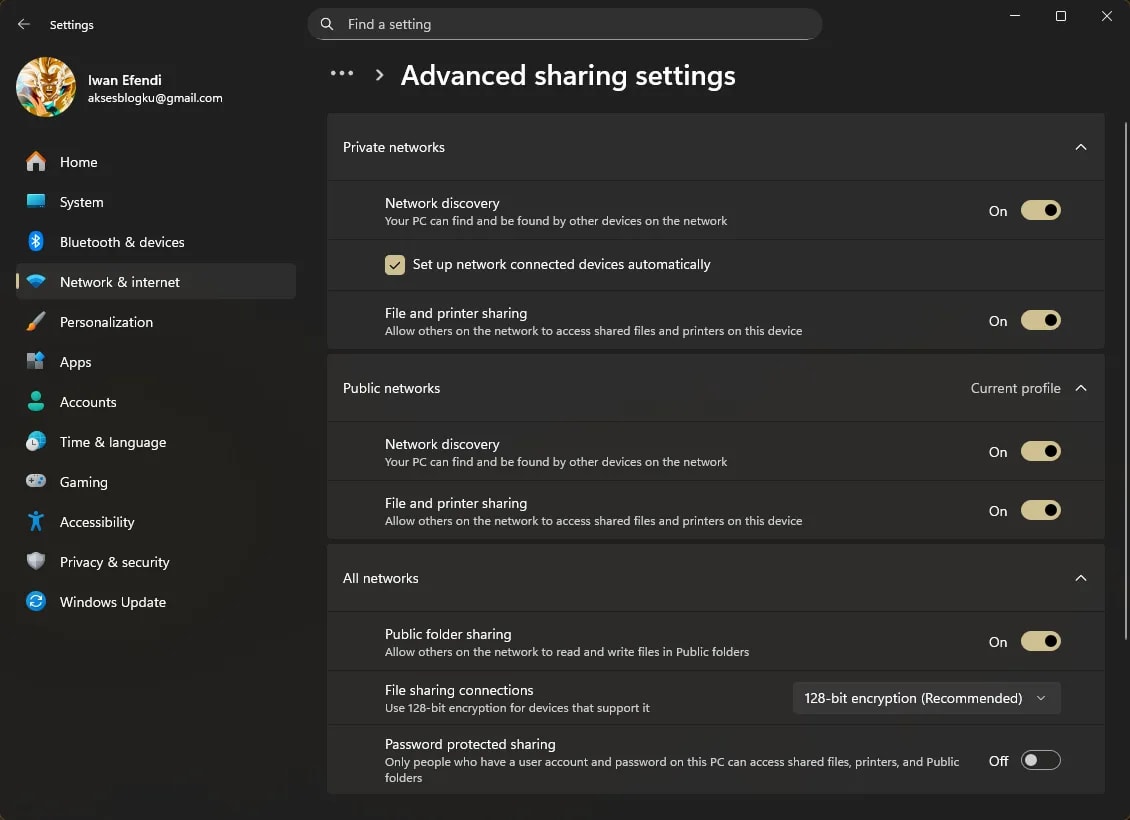
Open Advanced network settings, then under More settings click Advanced sharing settings.
3
Enable discovery and file sharing
Turn on Network Discovery and File Sharing for all network profiles you use.
Zoom
Important Security Note
In the All Networks section, turn off Password protected sharing only when you are on a trusted private network. This makes access easier because coworkers will not need a local username and password.
Private network works best
Folder sharing is easiest when both PCs are connected to a Private network profile. If Windows marks the connection as Public, discovery and file sharing can be more restricted.
Step 2: Share a Specific Folder
1
Open folder properties
Right-click your target folder, then select Properties.
2
Open sharing menu
Go to the Sharing tab and click Share....
3
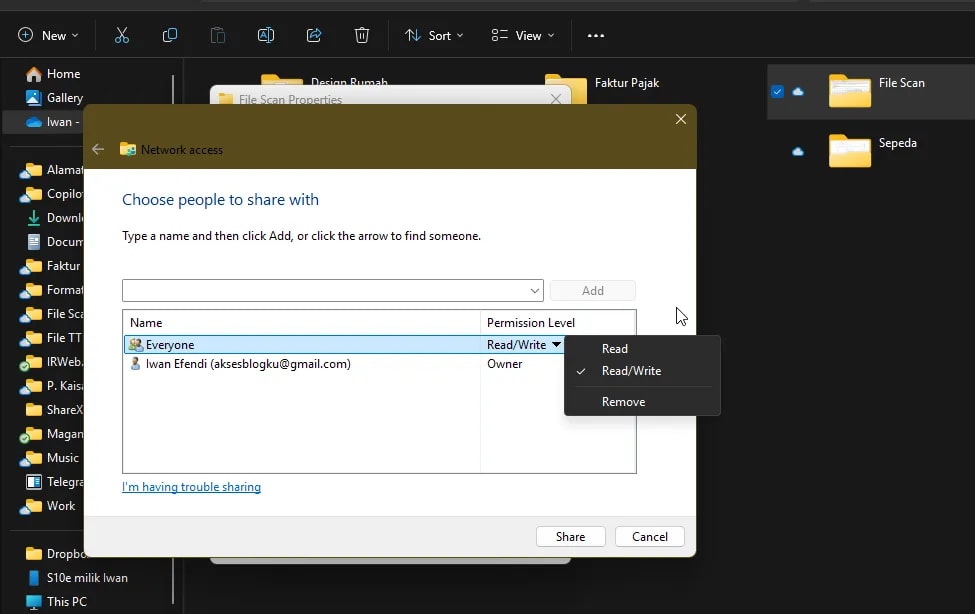
Add Everyone user
In the user list, select Everyone from the dropdown, then click Add.
4
Set permission level
- Read: users can view files only.
- Read/Write: users can view and edit files.
5
Complete sharing
Click Share to finish.
Zoom
Permission Tip
For mixed environments, start with Read first. Upgrade to Read/Write only for folders that require active collaboration.
Step 3: Access the Shared Folder from Another PC
Find the Source PC IP Address
1
Open Command Prompt
Open Command Prompt from Start.
2
Run IP command
Type
ipconfig, then press Enter.3
Note the IPv4 address
Find IPv4 Address (for example
192.168.1.5 or 10.27.30.150).Zoom
ipconfig as the target address.
Open Shared Folder via Run Command
1
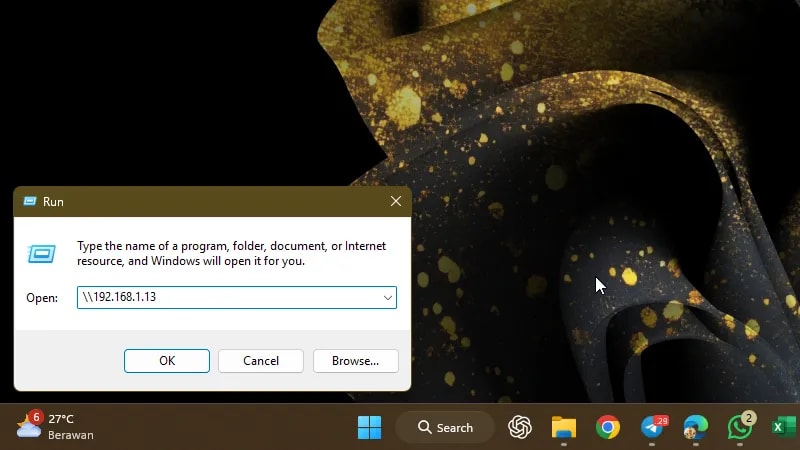
Open Run dialog
Press Win + R.
2
Enter target address
Type
\\ followed by the source PC IP. Example: \\10.27.30.150.3
Open shared resources
Press Enter.
Zoom
\\{ip_address} in Run to list shared folders from that PC.
If everything is configured correctly, File Explorer will show shared folders (and sometimes shared printers) from the target machine.
Step 4: If the Shared Folder Does Not Open
- Confirm both PCs are on the same network. A LAN cable and WiFi can still be on different subnets depending on the router. Compare the first parts of the IPv4 address, for example
192.168.1.x. - Use direct IP access first. Network discovery can be slow, but
\\192.168.1.5often works even when the PC name does not show up. - Check Windows Defender Firewall. File and Printer Sharing must be allowed on the active network profile. If you need to temporarily disable your antivirus for troubleshooting conflict issues, check out our guide on how to disable Windows Defender.
- Review folder permission and NTFS permission. Sharing permission may allow access, but the folder's Security tab can still block a user.
- Restart File Explorer or both PCs. Windows network discovery sometimes needs a refresh after changing sharing settings.
Avoid open sharing on public WiFi
Do not disable password protected sharing on public networks such as cafes, hotels, campuses, or coworking guest WiFi. Use it only on a trusted home or office network.
Step 5: Safer Permission Setup
| Scenario | Recommended permission | Why |
|---|---|---|
| Share documents for reference | Read | Others can open files but not overwrite them. |
| Team folder for active work | Read/Write | Use only for trusted collaborators. |
| Temporary file transfer | Read/Write, then turn off sharing later | Keeps the network tidy after the transfer is done. |
| Guest/public WiFi | Do not share | Use cloud transfer or a private network instead. |
FAQ
Why is my Windows 11 PC not visible under Network?
Usually Network Discovery is off, the network profile is Public, or File and Printer Sharing is blocked by firewall. Try direct IP access with\\ip-address while checking those settings.
Do I need to turn off password protected sharing?
No. Turning it off is convenient for trusted private networks, but it is not required. For better security, keep it on and use a Windows account that has permission to access the shared folder.What is the difference between Read and Read/Write?
Read lets others open and copy files. Read/Write lets them add, edit, rename, or delete files, so use it only for folders where collaboration is intended.Can I share folders between LAN cable and WiFi?
Yes, as long as both devices are on the same local network and the router allows devices to communicate with each other. Some guest WiFi networks isolate devices by design.Why do I get “permission denied” even after sharing the folder?
Check both layers: the Sharing tab permission and the Security tab permission. Windows can allow network sharing but still block access through NTFS folder permissions.Topics
Topics in this article
Explore related topics and continue reading similar content.
Share this article
Discussion
Preparing the comments area...