Clean Install Windows 11: A Step-by-Step Complete Guide
Iwan Efendi6 min

A Windows 11 clean install guide from bootable USB: backup prep, BIOS/boot menu, disk partitions, OOBE, drivers, and post-install steps.
Baca dalam IDID
Ready for a fresh start with Windows 11? A clean install is a good choice if your laptop or PC feels slow, has too many leftover apps, keeps throwing errors, or you simply want a truly clean system. A clean install can make Windows feel fresh again because the system is installed from scratch, not just reset lightly.
The process can look intimidating, especially around BIOS and disk partitions. But if the preparation is correct, the steps are manageable. This guide walks through the full flow: preparing a bootable USB, entering BIOS/boot menu, choosing partitions, completing OOBE, and checking the important things after Windows 11 reaches the desktop.
A clean install is suitable when:
Before we begin, let's get everything ready. This is the most important part to ensure a smooth process.
Preparation checklist:
Everything ready? Let's start the installation.
 BIOS screens can vary, but the principle is the same: find the Boot menu.
After the core installation is complete, you'll go through a series of setup screens called OOBE (Out of Box Experience).
Once you're through all that, you'll finally land on your clean, fresh Windows 11 desktop.
BIOS screens can vary, but the principle is the same: find the Boot menu.
After the core installation is complete, you'll go through a series of setup screens called OOBE (Out of Box Experience).
Once you're through all that, you'll finally land on your clean, fresh Windows 11 desktop.
Do not assume the job is finished immediately. Check these important items so the new system is stable:
Read this before continuing
A clean install will delete data on the selected Windows partition. Do not continue until important files, app licenses, Downloads/Desktop/Documents folders, and browser data are backed up.
When should you clean install Windows 11?
- Windows often crashes, errors, or feels slow even after cleanup.
- You want to remove vendor bloatware and leftover apps completely.
- The system was affected by malware and you want a clean starting point.
- A major Windows upgrade failed and rollback does not help.
- You are replacing an SSD/HDD and installing Windows from scratch.
- The system partition layout is messy and you want to rebuild it.
#1 Key Preparation (Don't Skip!)
Critical Warning! Back Up Your Data
This is the most crucial step. A clean install will delete everything on your primary drive (usually Drive C:). Please back up all documents, photos, and important files to an external drive or cloud service before you start.
| Preparation | Why it matters |
|---|---|
| Back up important folders | Desktop, Documents, Downloads, Pictures, and work folders are easy to lose |
| Check Microsoft account | Helps digital activation and sync after installation |
| Prepare charger | Do not let a laptop shut down during installation |
| Download important drivers | Especially Wi-Fi/LAN if the device often lacks automatic drivers |
| List important apps | Office, browser, editor, printer, VPN, and work apps |
| Check storage type | Make sure you know which SSD/HDD contains the old Windows install |
- Prepare a Windows 11 Bootable USB: This will be our installation tool. If you haven't made one yet, follow our simple guide here.
- Internet Connection (Recommended): It's best to have an internet connection ready. This helps Windows grab important updates and drivers automatically during setup.
- Note Down Your Product Key (To Be Safe): If your previous Windows was genuine and linked to a Microsoft account, your key is likely digital and will activate automatically. However, if you have a separate retail key, it's good to write it down.
About Windows license
On many modern laptops, Windows activation is stored as a digital license. After reinstalling the same edition, Windows usually activates automatically once connected to the internet.
#2 Installation Process, Step by Step
1. Booting from the USB Drive
- Plug your bootable USB into your laptop or PC.
- Restart your computer and get ready to enter the BIOS/UEFI menu. The key to press varies, but it's usually one of these: F2, DEL, F10, or F12. Press it repeatedly as soon as your computer starts up.
- Example on My MSI Laptop: I press the DEL key right when the MSI logo appears.
Zoom
- Once in BIOS, look for the "Boot" or "Boot Priority" menu. Set your USB Flash Drive as the number one boot option (
Boot Option #1). - Save your changes and exit (usually by pressing F10). Your computer will restart and boot from the USB.
2. Starting Windows Setup
1
Select "Previous Version of Setup"
The Windows setup screen will appear. Don't click 'Next' yet. Instead, look for the link at the bottom left that says "Previous Version of Setup" and click it. This is a small trick to start the standard, more familiar installation flow.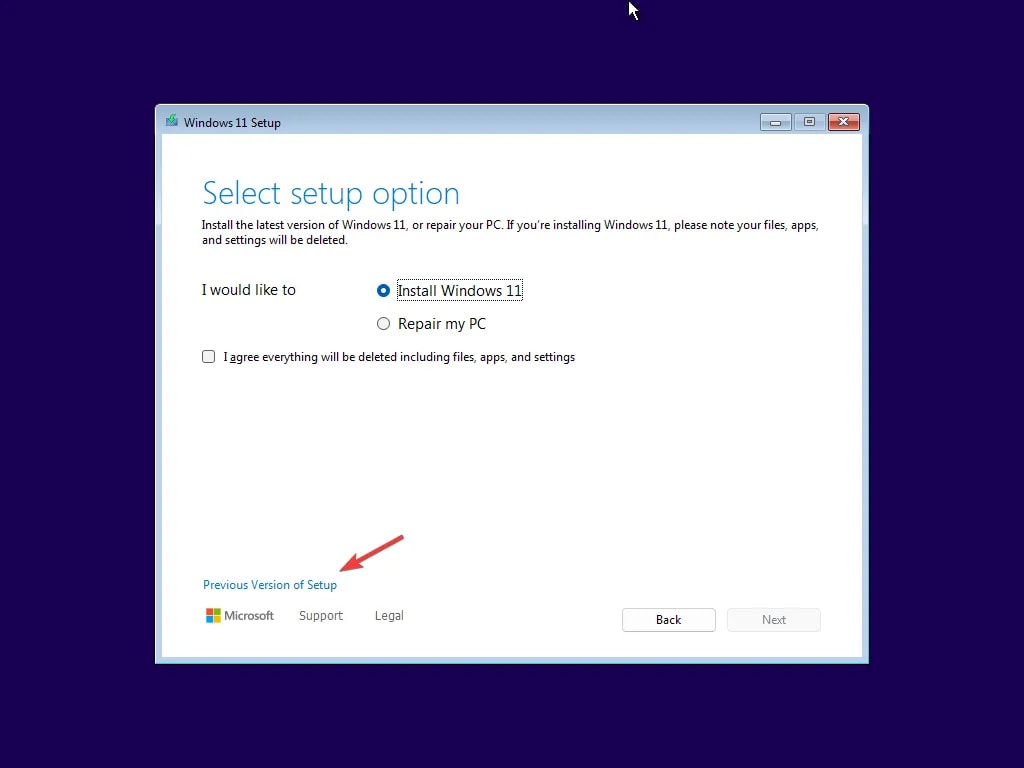
Zoom
2
Configure Language and Regional Settings
The next screen will ask for your language, time format, and keyboard. Click Next.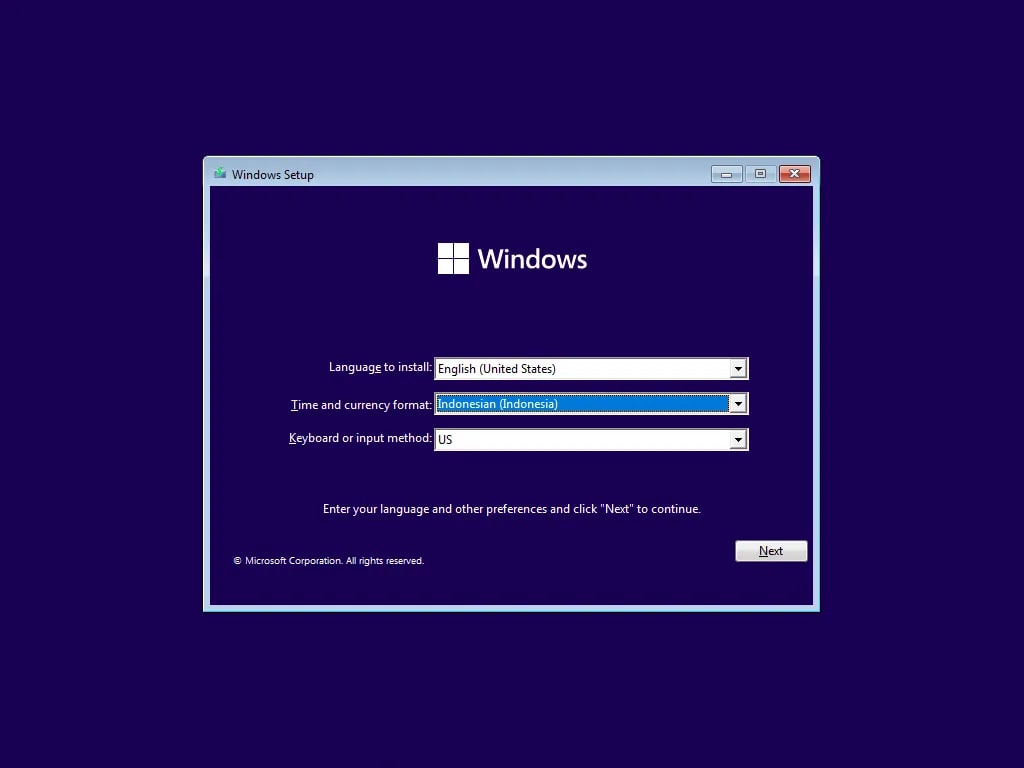
Zoom
3
Start Installation
Click the large "Install now" button to begin the process.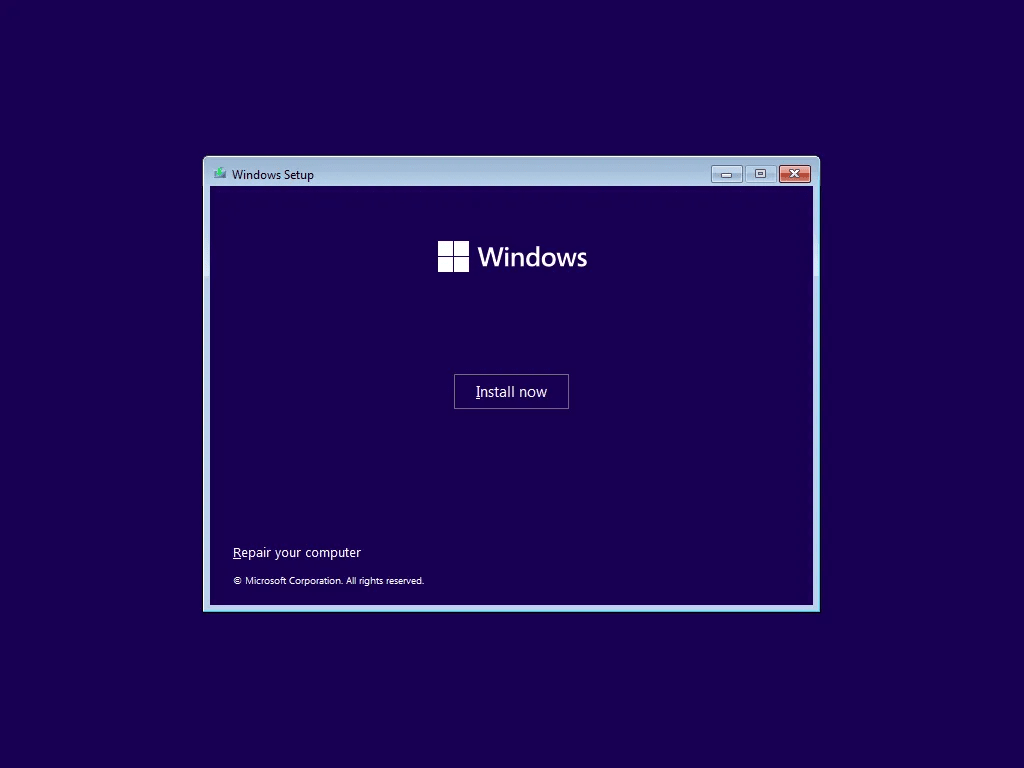
Zoom
4
Activate Windows
Setup will ask for a product key. If your license is linked to your Microsoft account, just click "I don't have a product key".
Zoom
5
Choose Windows 11 Edition
Select the edition that matches your license (e.g., Windows 11 Pro). Click Next.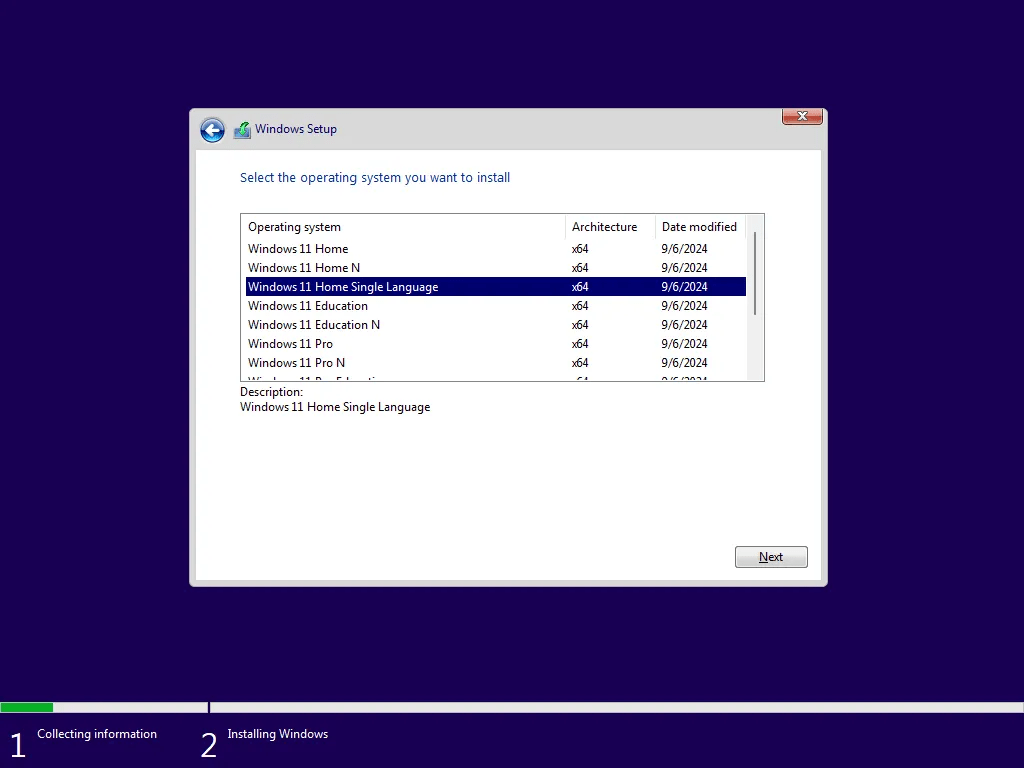
Zoom
6
Choose Installation Type
Always select "Custom: Install Windows only (advanced)" for a truly clean installation.
Zoom
7
Managing Partitions (Critical!)
Find the partition where your old Windows is located. Select each related partition (System, MSR, Recovery, Primary) one by one, then click Delete.

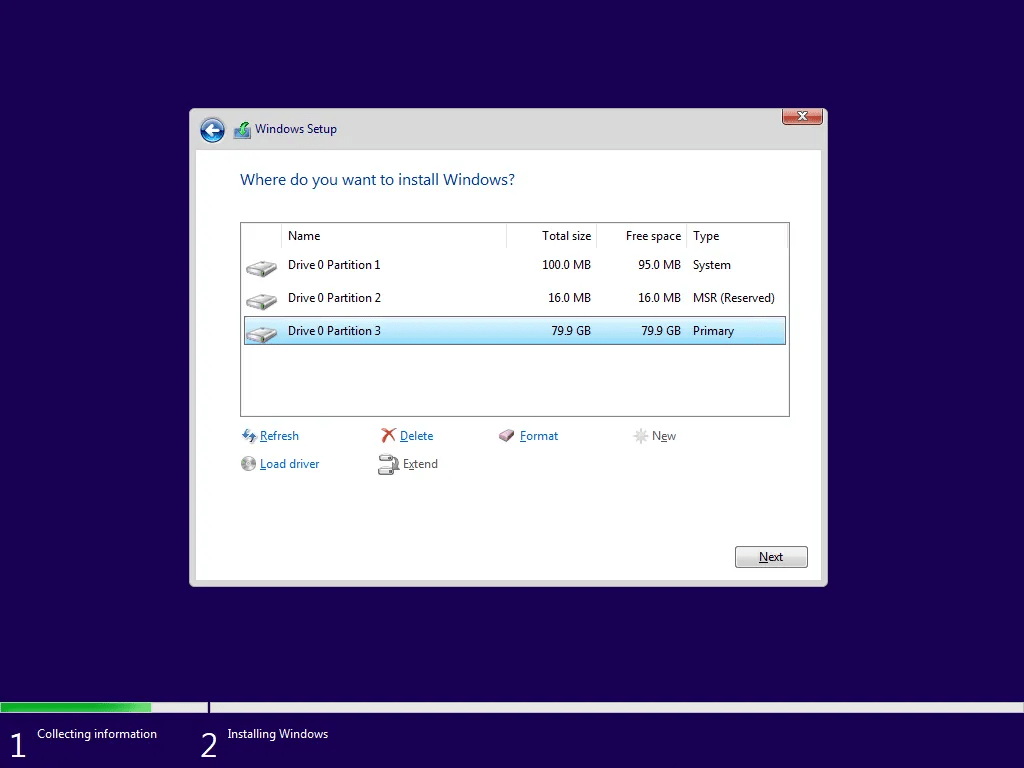 Once you have only one block of "Unallocated Space", select it and click Next.
Warning!
This step will delete all data on the selected partitions. Make sure you have backed up your important files. If there is a separate data drive, do not delete partitions you do not recognize.
Zoom
Zoom
Zoom
8
Installation Progress
Windows will start copying files. The computer will restart several times. Just let it do its thing.
Zoom
#3 First-Time Setup (OOBE)
1
Region and Keyboard
Follow the prompts to select your country, keyboard layout, and connect to Wi-Fi.
Zoom
2
Sign in with Microsoft Account
I highly recommend signing in with your Microsoft account. It syncs your settings and automatically activates your Windows digital license.
Zoom
3
Final Personalization
You'll be asked to create a PIN, set privacy settings, and choose your interests for customization.
#4 After Windows 11 reaches the desktop
- Open Settings > Windows Update and run updates until no important updates remain.
- Check Device Manager to make sure there are no yellow warning icons.
- Install GPU, chipset, touchpad, audio, Wi-Fi, or printer drivers if they were not installed automatically.
- Install important apps one by one, not all at once.
- Re-enable Windows Security protection.
- Sign in to OneDrive or cloud storage only after you understand the local folder setup, so files do not duplicate unexpectedly.
- Create a restore point or first backup when the system is stable.
Common Windows 11 clean install problems
| Problem | Common cause | Solution |
|---|---|---|
| USB does not appear in boot menu | USB format issue, bad port, or Secure Boot/UEFI mismatch | Recreate the USB with Rufus, try another port, choose GPT/UEFI mode |
| SSD is missing on partition screen | Storage/VMD/Intel RST driver not loaded | Prepare the storage driver from the laptop vendor or change storage mode in BIOS only if you understand the risk |
| Windows keeps asking for internet | Newer OOBE versions push online setup | Use internet if possible so updates and activation are easier |
| Activation fails | Windows edition does not match the license | Install the same edition as before, such as Home or Pro |
| Wi-Fi driver is missing | Driver not installed automatically | Download Wi-Fi driver from the laptop vendor using another device, then move it via USB |
Windows 11 Clean Install FAQ
Does clean installing Windows 11 delete all data?
If you choose clean install and delete the old Windows partition, yes, data on that partition will be lost. Back up before starting.Will Windows activate automatically after reinstalling?
Usually yes if the device already had a digital license and you install the same Windows edition. Connect to the internet after installation so activation can be checked.Do I need to delete all partitions?
Not always. Delete only the old Windows system partitions if you are sure. Do not delete a separate data drive or partitions you do not understand.Why use a bootable USB?
A bootable USB gives full control for a clean install, especially when the old Windows installation is damaged or you want to rebuild the system partition.What should I do if Wi-Fi is missing after installation?
Use a LAN cable if available, USB tethering from a phone, or download the Wi-Fi driver from the laptop vendor using another device.Topics
Topics in this article
Explore related topics and continue reading similar content.
Share this article
Discussion
Preparing the comments area...


