5 Free Apps to Check Your PC & Laptop Specs Thoroughly
Iwan Efendi5 min

Five free tools — CPU-Z, Speccy, HWiNFO, DxDiag, and built-in Windows info — I rely on to check detailed PC specs, from CPU and RAM to GPU temps.
A few months ago I tried installing a new game and spent an embarrassing amount of time troubleshooting crashes — only to discover my GPU didn't meet the minimum VRAM requirement. That moment made me realize I didn't actually know my own laptop's detailed specs beyond "i7 and 16GB RAM."
Knowing your exact hardware is the crucial first step before installing heavy software, upgrading components, or troubleshooting performance problems. I've since found five free applications that cover everything from basic CPU info to real-time temperature monitoring, and I want to share them with you.
CPU-Z is one of those tools that has been around forever, and for good reason. It's a free, lightweight system monitoring app for Windows (and Android) that detects your CPU, RAM, motherboard, and GPU with a minimalist but incredibly informative interface.
What surprised me the first time I used it was how much more detail it provides compared to the built-in Windows tools. It instantly identified my RAM type as DDR5, showed the exact timings, and gave me a complete breakdown of my graphics card — things the Windows "About" page simply doesn't show.
Here's what CPU-Z collects:
You can download CPU-Z from one of these links:
CPU-Z Installer2.1 MBDownload
Speccy is made by Piriform — the same team behind CCleaner — and it's honestly one of my favorites for people who just want clear, no-nonsense hardware information. The interface is clean and modern, and you don't need any technical background to understand the output.
What sets Speccy apart:
You can download Speccy from these links:
Speccy Installer7.3 MBDownload
For technicians, overclockers, and anyone who wants absolute depth, HWiNFO is king. It's a comprehensive hardware analysis and monitoring solution that supports everything from DOS to Windows 11.
I'll be honest — the first time I opened HWiNFO, I was a little overwhelmed by the sheer amount of data it threw at me. But once I got used to the layout, I realized nothing else comes close in terms of accuracy and coverage.
Key strengths:
You can download HWiNFO from these links:
HWiNFO Installer11.8 MBDownload
Sometimes you just need a quick hardware check without downloading or installing anything. That's where DxDiag (DirectX Diagnostic Tool) comes in — it's built right into Windows.
DxDiag is particularly useful when you need to verify DirectX compatibility or check basic video and sound hardware information. It's the tool I reach for when someone asks "what GPU do you have?" and I'm too lazy to open anything else.
 Here are some screenshots of what DxDiag shows:
 The absolute quickest way to see your main specs — no downloads, no extra apps. I use this whenever I just need to confirm my processor model or RAM amount in a hurry.
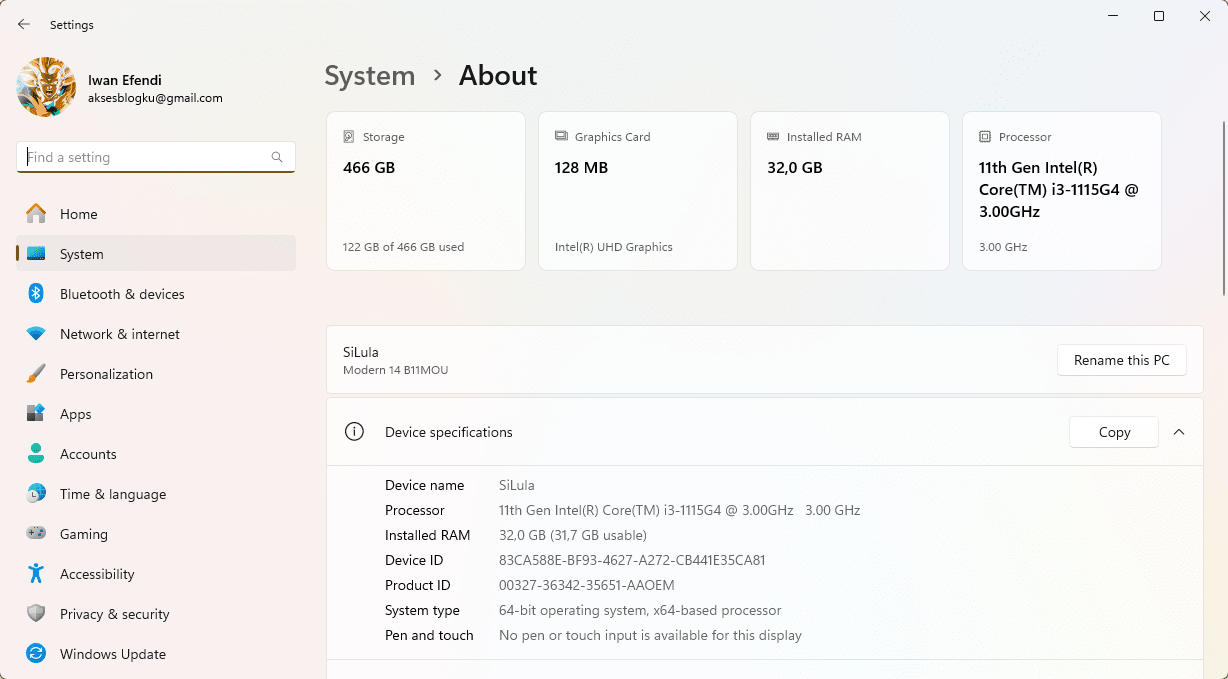 This won't tell you your GPU model or RAM timings, but for a quick sanity check — like confirming whether your laptop meets the minimum requirements for a clean Windows 11 install — it does the job perfectly.
Each of these five tools has a different strength. Here's a quick guide to help you decide:
This won't tell you your GPU model or RAM timings, but for a quick sanity check — like confirming whether your laptop meets the minimum requirements for a clean Windows 11 install — it does the job perfectly.
Each of these five tools has a different strength. Here's a quick guide to help you decide:
1. CPU-Z — The Legendary System Monitor
- Processor details — name, codename, process, package, and cache levels
- Mainboard and chipset identification
- Memory info — type, size, timings, and SPD module specifications
- Real-time frequency — internal clock for each CPU core and memory
- Full Windows 11 support
CPU-Z — Processor, Cache, and Mainboard tabs
CPU-Z — Memory, SPD, and Graphics tabs
Official Site Download Tip
If downloading from the official site, scroll down and look for the SETUP · ENGLISH section. Click DOWNLOAD NOW! on the next page to start the download.
2. Speccy — Simple, Modern, and Beginner-Friendly
- Trusted information source — helps you make informed decisions before upgrading or purchasing new hardware
- Clean, comprehensive display — CPU, motherboard, RAM, and GPU details laid out in a simple interface
- Real-time temperature monitoring — this is the killer feature, catching potential heat issues before they cause damage
- Export scan results — save as snapshot, XML, or text file to share with a technician or friend
Speccy — Summary, CPU, and RAM details
Speccy — Motherboard, Graphics, and Storage info
Speccy — Operating System and Audio details
Official Site Download Tip
On the official site, click Download Free Version, then Free Download, and finally Download to start.
3. HWiNFO — The Power User's Choice
- In-depth information — from a high-level summary to the smallest details of every component
- Real-time monitoring — accurate status reporting and failure prediction for each sensor
- Extensive reporting — multiple report formats and continuous status logging
- Trusted and privacy-focused — does not collect personal data and receives frequent updates
HWiNFO — System Summary and Sensor Status
4. DxDiag — Quick Info Without Installing Anything
1
Open the Run Dialog
Press Win + R on your keyboard to open the Run dialog.2
Launch DxDiag
Typedxdiag and press Enter.Zoom
DxDiag — System, Display, and Sound tabs
Zoom
5. Built-in Windows System Information
1
Open File Explorer
Open File Explorer from the taskbar or press Win + E.2
Access Properties
Right-click on This PC in the left sidebar and select Properties.3
View Your Specs
Windows will display basic information including your processor, installed RAM, system type, and Windows edition.Zoom
Which One Should You Choose?
- Beginners or quick checks — start with Speccy or the built-in Windows System Information. They're simple and get the job done.
- Gaming and multimedia — DxDiag gives you DirectX compatibility and GPU info without installing anything. If you're setting up something like a PS2 emulator, this is a fast way to verify your hardware first.
- Deep analysis and overclocking — CPU-Z and HWiNFO are the industry standards. If you're considering a RAM upgrade, these tools will tell you exactly what your current modules are and what your motherboard supports.
References
Topics
Topics in this article
Explore related topics and continue reading similar content.
Share this article
Discussion
Preparing the comments area...